MailChimp email templates allow you to send email newsletters faster by saving repeat information. MailChimp is a popular software dedicated to delivering Email Newsletters, Automated Onboarding Emails, and other Email blasts. Sending and managing these newsletters is a popular service provided by Virtual Assistants.
Why Learn MailChimp as a Virtual Assistant?
MailChimp is not the only email system available. In fact, there are multiple systems available with a variety of options and costs. MailChimp remains popular for many businesses that do not need advanced CRM (Customer Relationship Management) tools, so it's a good option for VAs to learn.
You can also start with a free account which isn't true for many of the options. This allows you to create an account and learn to use the software without any out-of-pocket expense.
Get started for Free with MailChimp.
Why Create an Email Template?
Email templates allow you to create a basic layout along with your standard information like social media links and business taglines. In the future, you don't have to re-enter this information, you just select the template, which saves time.
Steps for Creating a MailChimp Email Template
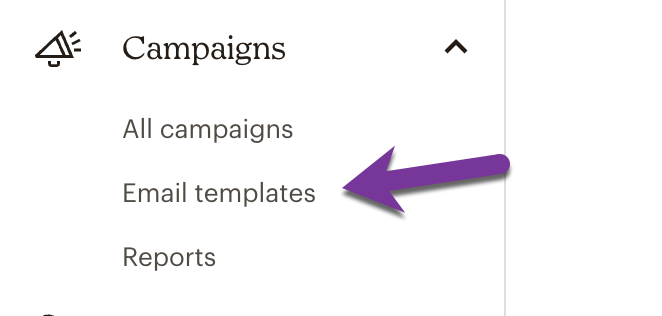
- From the MailChimp Dashboard, select Email Templates under Campaigns on the left side menu.
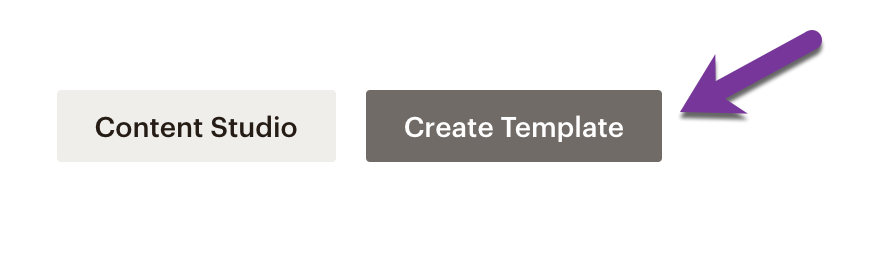
2. Click on the Create Template button at the top right. This opens the screen for selecting a default layout to get started. Options include single columns, multiple columns, and a variety of image options.
3. Select the one closest to what you think you want. It's easy to make changes once you get started. Once you have selected it, the basic template will open in the MailChimp editor. This is where you add your specific information.
When the template opens, in the middle of the screen, you will see what the email looks like.
On the right of the screen, you'll see the MailChimp Blocks available to add to this email.
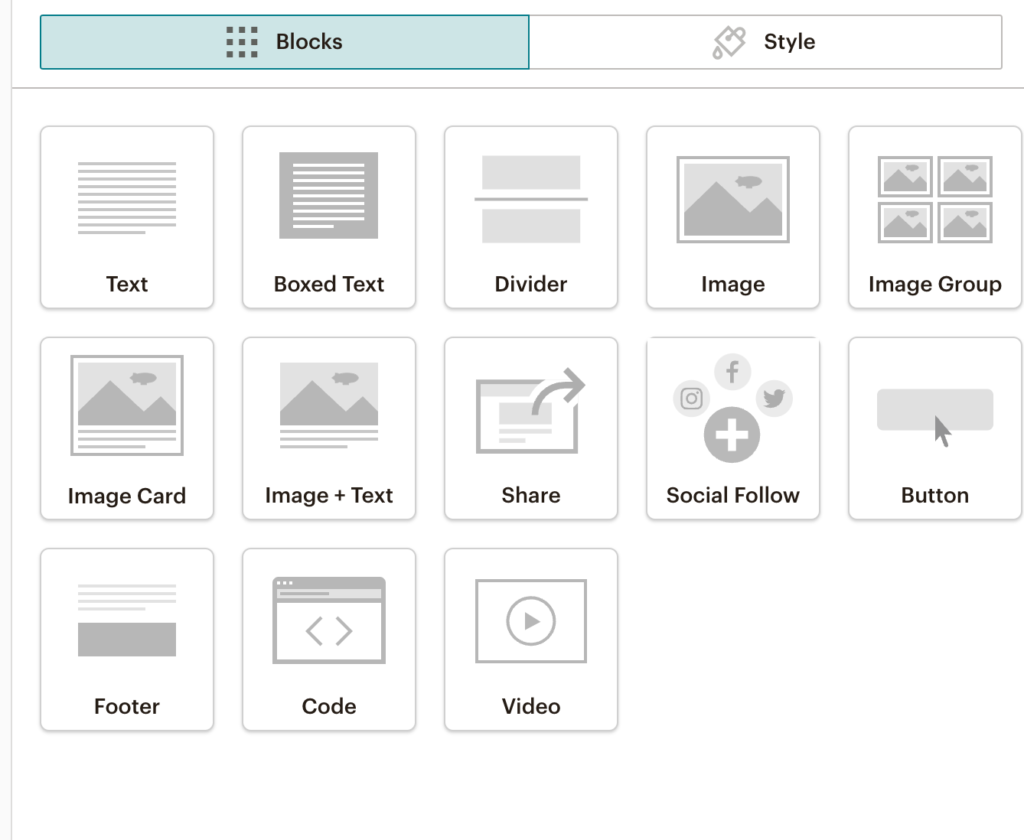
4. To Add a Block, select it with your mouse, then hold and drag it to the area where you want it to appear in the template.
5. Enter your filler information and any other blocks you want to enter.
6. Click on the Footer area where you see the social icons and configure these.
7. Once you are done, click on the Save and Continue button in the bottom right corner. This will ask you to name your template.
8. Enter the name and save this. Now you're ready to use the template to send out an email newsletter.
We'll cover how to use the template and send out a newsletter in the next post. Stay tuned.
Important – If Copying Information from the Web, Paste into a Text Editor First
There are many times when you might want to copy text from a website to add to your MailChimp newsletter. For example, when sending out a blast about your latest blog post, it's common to paste the introduction into the newsletter.
The challenge is that when copying text from outside sources like a webpage or word processor, there are sometimes hidden formatting codes contained within the text. These can wreak havoc when trying to format your MailChimp Newsletter.
In order to remove this issue, copy your text and paste it into a text editor. This will strip out any hidden codes, then copy the text from the text editor and paste it into MailChimp. This will solve a lot of headaches.
If you are using a Mac, Text Edit is an editor that comes installed, and if you are using Windows, Notepad is the default text editor.
Transcript of How to Create an Email Newsletter Template in MailChimp
(00:01):
Hey everybody. It's Kim Shivler. Welcome. Today, I'm gonna show you how to make an email template in MailChimp for sending out email newsletters. As I've said, this is a very popular service for virtual assistance to provide by creating a template. We can make it a lot easier to send those ongoing emails, because we don't have to reenter a lot of the basic information like logos and links to our social media. So that's what we're gonna do today. We are actually going to be sending or creating an email template for my weekly blog updates. You may have seen my template or a template I've had. So I'm gonna click here on email templates. I'm in my dashboard and you may have seen my VA three items template when I sent a message recently or a newsletter recently, right? This is that. And that's how the newsletter actually looked today. We're actually going to create a template. That's just holder material, placeholder material for when I send out a blog post. And then later today, I'm going to post some information on actually sending that blog post, or I'm gonna tape that video. The first thing we wanna do here in our templates is click on create template.
(01:34): Select The Template Layout You Want to Start With
Now this is going to give us a place to start, and I'm gonna just do a one column. We talked about my last piece of information. I had several things to share. I did the three columns this time. We're just gonna pick one column. We're not gonna pick any more than that. This is my very basic layout to get started with. We're gonna start by adding our logo. So I'm gonna click right here. Now you'll notice it's kind of centered as far as where the newsletter is, but when I click on the area, the editing happens over here to the right, and they have a default image here. So we're gonna click on replace and I'm going to upload an image. These are all the images I have uploaded in the past, and this is my virtual assistant opportunity logo. So there we go. It's right there.
(02:41): Once You Add an Image – You Can Make Some Changes If Needed
Now notice it shows the size 200 by 205 pixels, and I'm not getting any kind of error message. As far as it being too large. If you get an error message on being too large, it'll give you an option to click on and fix it. We'll cover that in the future. But for right now, we're just going to leave this. And it's just a good idea. Try to make small images, resize your images to be smaller when you're sending them out in email, because they'll load faster for people. Now I can display it. I can make it a little smaller. If I wanna display it. You know what? I am gonna display it a little smaller. There we go. And then if I wanted to add a link to it, I would click here. I'm not going to, I'm gonna let, just let it stand alone for today. I do wanna add my alt text whenever we're working with images that are going out over the internet, we wanna add alt text. This is so if someone is using a screen reader, it can understand what the image is.
(03:52): Add Alt Text for Images
So I'm just going to type Virtual Assistant Opportunity logo. And, um, that's what it is. I'm then gonna update it. And now I can come over to the text area. Now, as I mentioned, I'm just going to make this kind of placeholder text. So this is going to, going to heading here is gonna be my blog post title. And then this is going to be my post-intro and link to the post.
(04:37): To Add a Block, Drag it from the Block Area and Drop it Where You Want on the Template
Now I'm going to save and close that. And I do wanna add another little box of text under here. So I'm gonna add a divider first. So notice here you drag it or see, I grabbed it from this site. I drag it over and you can see where it's going to be dropped. So drop block here. I've done that. I now get to pick my border type. Do I want it solid or dashed or dotted a double. I'm gonna go ahead and try that double for now. And right now I'm just gonna leave it at. I'm gonna do four pixels and I'm gonna come back and change that color to match my purple or orange note that you can apply it to all blocks. So if I was working with a large newsletter, a long newsletter, and I had multiple dividers in, I could change all of them at once.
(05:36): When You Copy Something To Add To Your Newsletter – Make Sure To Paste Into A Text Editor Before Adding To MailChimp
I'm gonna save and close that. Now I'm gonna add my little text area underneath it. And this is going to be some general information about a virtual assistant opportunity. I'm gonna paste that in. So notice I'm gonna switch over here to my text, edit. This is really, really important. If you are going to copy and paste from something, say a blog post, which we're going to do in the next video. You want to always paste it into the text editor first. So I actually grabbed this from my YouTube channel. I copied it from my YouTube channel, and I pasted it here in the text. Edit. It's very important because sometimes you will get hidden formatting. And if you don't, if, if you don't pull it out of a text editor, you'll paste it over here in your text block, and you'll try to format it and it'll look like it's formatting in one place, but it won't format properly on the actual newsletter.
(06:47): Text Edit is a Free Editor for Mac and Notepad is a Free Editor for Windows
So always paste anything into just a text editor, uh, on a Mac it's called Text Edit. It's free. It comes with it. On Windows, Notepad is free and comes with Windows. That's what you can use. So here I I'd like to make the size a little bit bigger. So I'm gonna click here on this size. Let's do 18 points and let's center it. Okay. That's a little bit there. So I'm gonna save and close that. Now I could continue adding more information, like text images, et cetera, but I'm just going to leave it like this.
(07:26): Add Your Social Media Links in the Template Footer
I am going to add my social media, which is here in the footer. So I'm gonna click on this area. Notice over here, on the right, Social Follow shows up. I'm going to remove Twitter because right now we're not actually using Twitter. I'm going to grab my Facebook URL and paste that in. I'm going to go ahead and put my website in, and I'm going to add Instagram. So notice it's telling you, you can add up to 10 services for people. All right, these are the ones that I'm actually active on right now. So this is what I will add.
(08:39): Save Your Template to Use When You Send Future Email Blasts
And I'm gonna save and close that now for now. This is really all I want. I'm going to obviously fill it in each time and we will do that in my next video for now. What I'm gonna do is save and exit. And it's gonna give me the option to name it, or it's gonna ask me to name it. Notice up here, it was untitled. So I'm going to call it VA Blog Newsletter. Cause this is what I'll send each week. When I post the latest blog post, I'm going to save that and here we can see it in the next video. I'll show you how to come in, take that template and turn it into an email that we will then actually send I'm Kim Shivler. Thanks for joining me. I'll see you next time. Bye.
Remember, You Can Get started for Free with MailChimp.
Other MailChimp Resources
I can't create in-depth training for each piece of software that you might need, so I'm looking for other options that might help you.
Beginner's Guide to MailChimp – https://www.youtube.com/watch?v=h71BKbaWHKI
NYC Tech Club Guide to MailChimp – https://www.youtube.com/watch?v=7-DJs1H7kuI
What I like about these is that they have timestamps in the video information box which helps you find specific areas you'd like to watch. If you use either of these, please send me your feedback.