It's easy to send newsletters in MailChimp when you first create an email template. Once you have created your template, like we did in the last post and video, it's easy to login to MailChimp start with the template and create a new email.
Steps to Send Newsletters in MailChimp from a Template
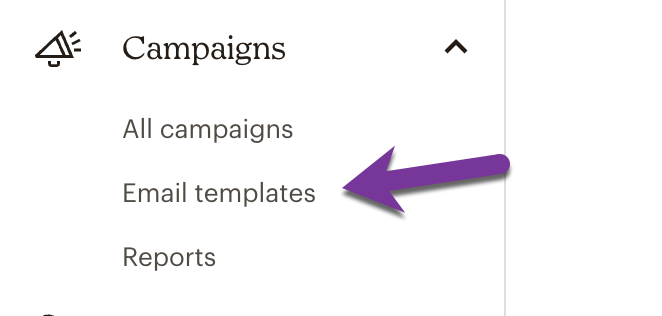
- Login to MailChimp and select Email Templates from the Campaigns Menu on the right.
2. Find the Email Template you want to use and click the down arrow next to where it reads Edit and select Create Campaign. NOTE – click the down arrow, not Edit. Selecting Edit will edit the template, not create a new newsletter campaign.
This starts the process of creating and sending the email.
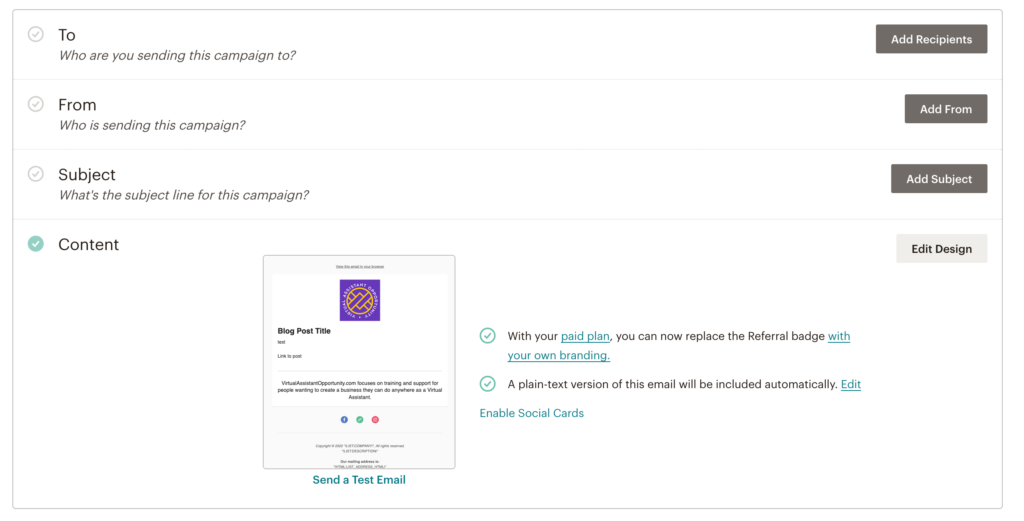
3. Select the audience to send to and segment it by tags or groups/segments if needed.
4. Enter a Subject Line that will show up in the Email Subject Line in the email reader.
5. Add the Subject Description. Not all email readers show this information, but add some additional information concerning the topic for those that do.
6. Click to Edit the Design and add the main information for the newsletter. See the MailChimp Template Post for more information on adding images and text into your newsletter.
7. Once you have added your information, select Save and Continue in the bottom right corner.
8. Make sure to send a test email and proof that it works properly before sending to your audience.
9. After you proof your test email and are happy with the results, select Send from the MailChimp Dashboard and your newsletter will be on its way to your audience.
Important – Paste Text Into a Text Editor before Adding to MailChimp
In the last post, we covered the fact that when you copy text from websites and other sources there are sometimes hidden formatting codes copied with the text. To make sure you don't have issues when pasting these into MailChimp:
- Copy them from your original source.
- Paste them into a text editor. Windows come with Notepad, and Mac comes with Text Edit.
- Copy them from the text editor and then paste into the MailChimp editor.
The above may seem like an extra step, but it will help you keep your sanity by stripping hidden codes and allowing you to work within MailChimp to easily get the results you want.
Transcript How to Send a MailChimp Newsletter from a Template
(00:00):
Hey everybody. It's Kim Shivler. Welcome. In my last video, I showed you how to create an email template in MailChimp. Now we're gonna go use that template to send newsletters in MailChimp including links to my latest or with a link to my latest blog post I'm here in my MailChimp Dashboard. And I'm gonna click on Email Templates. Now we mentioned this in the last let's remember we're gonna use the VA blog newsletter. We don't wanna click on edit that would actually edit the template itself. Instead, what we do is we click the down arrow and we're going to create a campaign from this template.
(00:51): Create a Campaign from Your Template and Select an Audience
So we have the template here, which we're gonna edit. First, we have to figure out who are we sending the campaign to add recipients? So our audience is actually my Total Audience and we're actually not gonna personalize this one. And then I have to pick my subscribers. What I wanna do is I'm gonna come down to my tags and I'm going to use the VA-Opp tag. everyone who signs up through virtual assistant opportunity, any of my virtual assistant programs gets this tag. So those are the people I want to have it sent to. It's from goodies@kimshiver.com. That's fine. We're gonna add a subject. So I'm gonna just gonna put, uh, virtual assistant opportunity blog, post and bonus video.
(01:59): Add Preview Text after the Subject
The preview text. Doesn't always appear for people. Uh, many of the readers depends on your, how you're getting your mail. You may not see anything here, but I go ahead and put a little bit of preview in for those people that do. So I'm gonna put, learn how to create an invoice in Microsoft Excel in this week's blog. Okay? And now I'm gonna save that and I'm going to edit the design. This is where we're editing what we've added. So if you remember from the last one, this was just my sample text. So blog post,
(03:09): The First Sentence of a Post Can Show the Reader What to Expect in the Article
My post intro is going to start with here's my post right here. And I'm actually gonna just use the first sentence because I've written a little bit something else that I didn't show you because you don't need to see me writing. I'm gonna copy that. And then if you'll remember from last time before we paste it, we need to paste it into text edit so that we don't get any weird formatting.
(03:39): When Featuring a Blog Post, Link to the Post in Your Email
So now I'm gonna highlight this. That's the one I just copied and pasted along with one other one or the little bit extra that I added and we're gonna come back here and this is going to go here on our post intro. So I highlighted that and pasted over it. Now the link to the post, we're gonna type in, read more and I'm gonna come over here to the post. What I'm doing is highlighting this
(04:12): When Copying a Link, You Don't Have to Post to Text Editor First
Search bar. That's actually the link to this post. I'm gonna come here, highlight, read more and click up here in the content ma um, formatting area, click on the link. And now I'm gonna paste that in. Now in this case, you don't have to paste it to the text edit first, because this is just a link. We are not adding this to our password protector. This is just a link. This is not, um, not something that's going to be formatted. It's the formatting that can be messed up if you don't, uh, put it into a text editor first to strip out that extra formatting, those extra formatting options. So I'm gonna click here on save and close, right?
(05:05): Although You Start with a Template, You Can Add Extra Text, As Needed
So now this is actually what I want this to say. I am gonna add a little bit, cause if you remember, I put bonus video. So here I'm going to put bonus video for my email per my email, uh, subscribers. I'm gonna go ahead and make that a little larger. I should not make that 24.
(05:50): Adding a Bonus Video to an Email from Vimeo or YouTube, is as easy as Pasting a Link
And I had actually copied the link before. So now I'm going to enter a, um, using PayPal to create an invoice and get paid fast. I'm going to highlight that text. I'm gonna click the link again and I'm pasting in that web address where I don't wanna do that. And so now I have this bonus video for my email subscribers. I can save and close at this point and then I want to continue.
(06:36): Send a Test Email to Yourself to Make Sure it Looks Right Before Sending to Your List
Now, technically I could go ahead and send this. It's in a draft, but I could send it. What I actually wanna do is send a test email, see this, send a test email, never send something out without sending the test and just checking that everything is working. Okay. So now I'm gonna come over to my Gmail. Let's see if I can get it into it from here. I may have to go over to another screen. Let's find out Nope, here I am. And you can see the test blog post. This is what it's actually gonna look like. So I come to my email and I look at the test notice, there's a note that the images aren't displayed, I can set to display the images and I can even set to always display them. So we'll go ahead and click on this. Now you can see my logo, my text, my links, and then all of my social links.
(07:41): Click on Your Links in the Test Email to Make Sure They Work
Everything looks good. I do recommend go ahead and click on your link and make sure it opens properly. Looks great. Click on this link. That brings up my video.
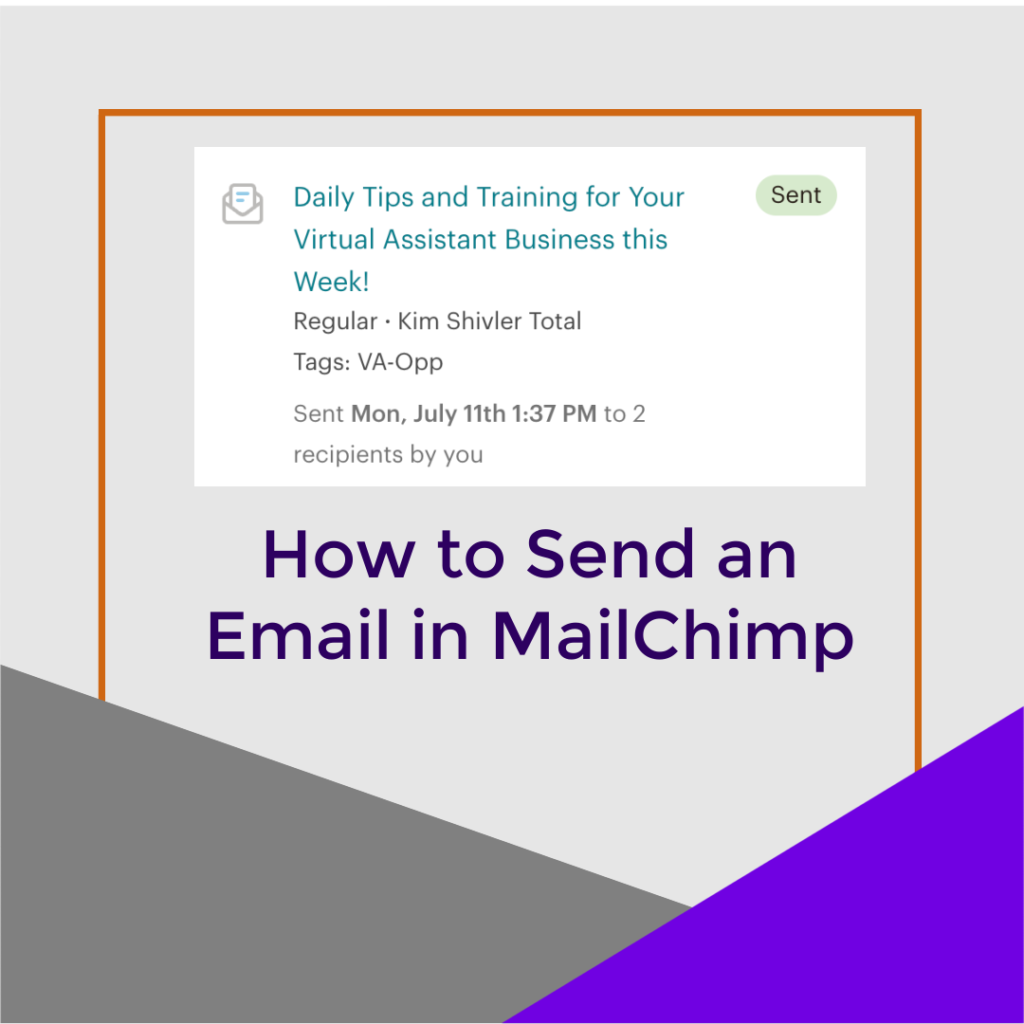
(07:58): Once Everything Checks Out, Send Your Email with a Click of a Button
Now it's so me to edit page that's because I am an administrator. You won't see the edit page or anyone who gets the email. Won't see the edit page at this point, it looks good. I'm gonna go back to MailChimp, right? And now I'm gonna click send. And in this case, what I picked had two subscribers. I actually need to look into that because I have a few more than that, but that has to do with me and tagging and not something you need to worry about for this. And then they tell you, all right, it's out there. It's all good. They've sent it. And in the future I can come back and see a report as to who clicked, who opened it, who unsubscribed, et cetera. I'm Kim Shivler. Thanks for joining me. That's how you actually come in and create a MailChimp email from an email template. See you next time. Bye.