A Facebook Business Page allows you to showcase your business services on Facebook. When first getting started, this can work as your website until you have time to create a website.
In this post, we'll cover the steps to Create a Facebook Business Page for your Virtual Assistant Business.
Download a Free Guide with The Steps for Creating Your Facebook Page with More Screen Shots
To increase page load times, I limited the amount of screen grabs added to this post. For a complete guide of steps and screen shots, download a PDF or text version of How to Create a Facebook Business Page – 2023.
Steps to Create Your Facebook Business Page
- From your Personal Facebook Profile, select See All > Create > Page
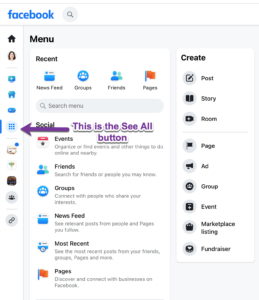
This opens a Create Page view with information to add and a view of what the page will look like.
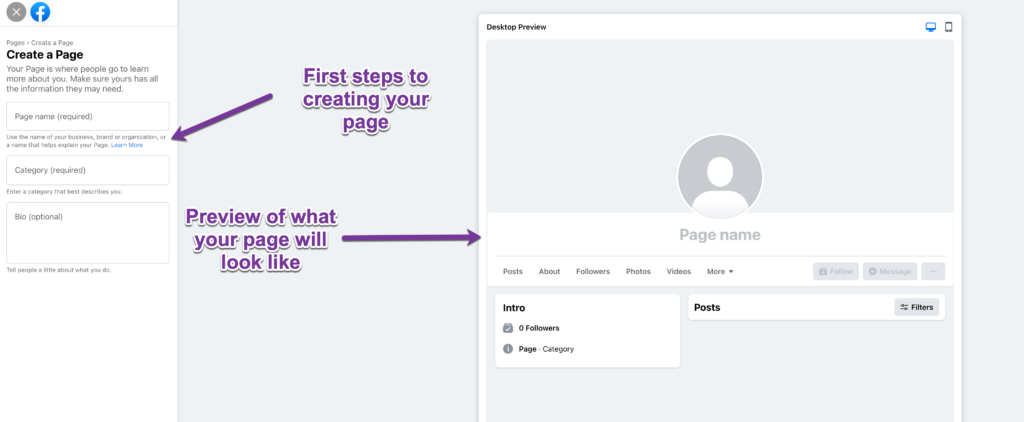
- In the Create a Page section enter your:
- Page Name
- Category–You must select from their pre-determined options. Business Consultant works well for Virtual Assistants. You can add additional categories. See notes below on tips for your categories.
- Optionally, add Bio information to show on the page. – You can add this later, if desired. This section is limited to 101 characters. You will be able to add more information in the About section.
3. After entering your information, click on Create Page at the bottom of the screen under the form.

You will receive a Congratulations notice that your page has been created. This will then open the next screen to “Finish setting up your Page.”
Finish Setting Up Your Page
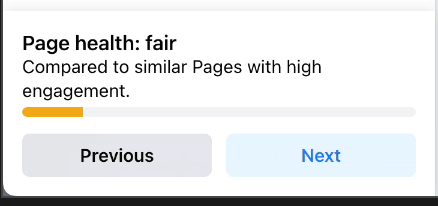
The Finish Setting Up Your Page form shows step 1 of 5. This process will walk you through 5 screens to enter additional information for your page. You can add this later, if you do not have the information at this time.
As you move through this process, you’ll see a Page Health notice at the bottom left that will improve as you add more information.
Download a Free Guide with The Steps for Creating Your Facebook Page with More Screen Shots
To increase page load times, I limited the amount of screen grabs added to this post. For a complete guide of steps and screen shots, download a PDF or text version of How to Create a Facebook Business Page – 2023.
Finish Setting Up Your Page Step 1 of 5 Entries
On this form, enter the following information:
- Website address.
- Phone number–note I don’t recommend putting your personal cell phone number online. More solution recommendations coming soon for this. Google Voice and other virtual phone numbers can work well as business numbers. Initially, you may decide just to use an email address or ask people to message you via Facebook or What'sApp.
- Enter your business email address, not a personal email address. If you are following my program to create your Virtual Assistant business, creating a free Gmail account reserved just for your business is one of the first steps.
- Under location, enter an address, if you have a business address. Don’t put your home address, here. If you don’t, yet, have a business address, you can complete it later. Note that if you have rented a Mailbox to provide your business a formal address, you can use this. Make sure you include a Ste or mailbox number not just the main street address of the mailbox location.
- If desired enter your office hours. For most Virtual Assistants this is blank, unless you have set hours where anyone can call you once you add a phone number.
Click Next at the bottom of the form to continue to the next step.
Step 2 of 5 allows you to customize your page including your Page Profile Picture and Cover Photo.
Upload your page Page Profile picture. You may drag it into the space, or click on the + sign, navigate your hard drive and upload it.
Upload your cover photo. You can create a cover photo in Canva. Learn how.
This step also allows you to add an Action Button to your page.
- Action buttons allow you to solicit messages and other forms of engagement from your visitors. Click on “Add Action Button” to get started. This opens a window allowing you to Customize your Action Button.
- Click on Try It to get started.
- Select the type of Action Button you want to create. In our case, I am selecting “Send Email.” This will allow people to send me an email directly from the page.
- Depending on the Action Button you select, you the prompts for completion will differ. In this case we are asked to enter the email address where we want to button to send the emails.
- Complete the prompt associated with your action button, then click Save.
Step 3 of 5 Allows You to Connect What'sApp to your Page
If you have a What'sApp number, you have the option to add it to your page.
Step 4 of 5 Allows You to Invite Friends to Like Your Page
Optionally, invite your friends to like your page. This is a good way to start building your audience, if you have friends that will be interested and supportive of your new business.
Be careful, sometimes friends and family drag us down with their ideas, so skip people who will show up as Negative Nellie’s to your new venture.
Step 5 of 5 Has Options to Stay Informed About Your Page
You have the option to receive notifications on your profile and also to receive marketing messages to learn about Meta products. I stick with the defaults.
Meta Products include Facebook advertising, scheduling Facebook and Instagram posts and other business information about your page.
At this point, you have successfully created your page. Take the Tour offered to learn more.
Two Very Important Steps to Fully Complete Your Page
In reality, there are several things you’ll want to continue adding, we’ll learn to edit what you already have and of course, you’ll want to start posting. More information on these topics coming soon.
For now, there are Two things you want to complete before moving on.
- Enter the desired URL for the page
- Add Services to your page
How to Add Services to Your Page – 2023
The latest update of Facebook Pages changed the ways services are added, and has caused confusion for many.
When you are in editing mode on the page, you’ll see a call out box on the site titled Manage Page. At the bottom of this box under More tools, notice the menu item Meta Business Suite.
- Under Manage Page, click on Meta Business Suite.
This opens a screen showing All Tools.
Notice there are many options on this screen including ways to create Facebook ads, schedule your content to be posted, sell products and list Services.
- For our purpose, click on the Services option. This opens the services listing box, which is originally empty. Click on Add Service to create your first service.
This opens an Add Service form.
- To create your service:
- Add a photo, if desired.
- Enter the name of your service.
- Enter a description of the service.
- Add pricing. Note that Starting at, Ask for price, and Custom are all options if you don’t want to enter a specific amount.
- Select your duration.
- Click on Add Service to add your service.
Once you have added a service, you’ll notice that there is a Services tab listed on your page. People can now learn about your services and contact you for more information.
Request Your Facebook Page URL
The last thing you want to make sure you do when first creating your page, is to configure your username which will be your page URL.
- From the Manage Page box, select Settings.
- This opens the General Settings tab where you will see your page name and a blank username.
- Enter your desired username.
- If it shows available, click Save Changes.
Note that you will need to enter your Facebook password in order to get this to work.
Once complete, you have a Facebook business page and all the basics to get started posting more about your business and interacting with customers and potential clients. If you have questions, please ask them in the comments and feel free to share your page in the comments once you have created it.
If you're on my mailing list, keep an eye on your emails for more information coming soon on using your Facebook page for business and ideas of services to add to your offerings along with description.
Not a member yet? Sign up below to stay in touch and get a downloadable guide with additional screenshots.
Download a Free Guide with The Steps for Creating Your Facebook Page with More Screen Shots
To increase page load times, I limited the amount of screen grabs added to this post. For a complete guide of steps and screen shots, download a PDF or text version of How to Create a Facebook Business Page – 2023.
Transcript of Video How to Create a Facebook Business Page for your Virtual Assistant Business
(00:00):
Hey everybody, it's Kim Shivler. Welcome. Today we're going to look at How to Build a Facebook Business Page, particularly if you are running a Virtual Assistant Business or Virtual services Business. So we'll look at building the page, adding our services, et cetera. We need to start from our main profile. So what happens is you can have a lot of profiles in Facebook and each time you have a page that you manage or your business page, that's going to be a new profile for you. But we can only build new pages from our main personal Facebook profile. Now, side note, I don't really use Facebook much for personal work. I tend to use it just professionally with my business pages, although I have a few friends, uh, from way back that we keep in touch a little bit. But this is how I choose to do Facebook.
(01:04): From Your Main Profile, Select the Option to Create a New Page
But if you are using Facebook actively and you're going to create this business profile, that's going to be a new page. So let's go ahead and look at that here on my main Facebook page, on the left menu, you will see this little icon with the dots on it and it says, see all. If I hover over it, I'm going to click on that. This is all the things I'm allowed to do from here. And one of them is to create a page. So I'm going to click on that. Now this gives me kind of a preview of what it's going to look like, although we're going to see it's not a hundred percent. So we're gonna play with that preview, but we're going to actually dig in more as we, you know, build the page. Because actually the profile picture is going to show up on the side over here, not in the middle.
(02:04): Enter the Name of Your Facebook Business Page
I do want a quick thing to tell everybody. Make sure you are checking the mobile and the desktop and when you're done, I recommend actually checking the page from your mobile device if you're building on a desktop, just to make sure it's looking right to the people finding you and interacting with you on mobile. So first we've got to put our page name in. I'm gonna put in Kim Shivler Content Services because that is what we're going to be building. Here is my content service page. I still do some content services for people though most of what I do now is training and coaching. We then have to enter a category. You can't pick this and enter anything. This has to be one of the categories that they actually have. So for example, Virtual Assistant is not an option.
(03:11): Select a Business Category for Your Facebook Business Page
Virtual Services not an option. I usually use Business Consultant. There is a way sometimes to go back and add some other services. I will show that in the future, but for now, I consider myself a business consultant, someone helping people, consulting with them and working with them on their business. You have the option to add a bio quick info piece there is limited to 101 characters. So I'm going to come over here. I have created a quick bio. You can skip this or you can add it later as we go through this process. I am not going to fill in everything. You don't need to watch that. I just wanna give you the highlights and the gotchas. We're then going to create the page by clicking on create page and it's gonna take a minute and now it tells me it's created. Now I can add images, go to the page, add details, et cetera.
(04:21):
So as we get here, page Step 1 of 5. So it's gonna walk us through some steps. We wanna add our website if we have it. You may not have that yet. You can add it later. As I've said before, if you're just getting started as a Virtual Assistant, this page can serve as a webpage while you're building your site because you can list information about yourself, services, how people can contact you, et cetera. If you have a phone number where people can call you, enter this. I do not recommend putting your personal cell phone here. If you have a business number, great. If you don't, I would just leave that out. I do recommend putting in an email address where people can contact you and I recommend you create yourself a business email address. This should not be your personal, create a business email address. It's okay to create a free Gmail account that says something like your name, virtual services gmail.com. You just have to work with it and find what's available. As with the phone number, if you have a business address, business location, put that here. I don't recommend putting your home address here. If you're going to have set hours, you may put them. This I tend to find is from companies that actually, you
(05:56):
Know, open at specific times. For most of us who are virtual, we don't put anything here. And we will get a little progress report here at the bottom telling us the health of our page. How much information have we provided compared to other pages with high engagement? Let's go ahead to the next setting. We're gonna click on next. Now the key here is we want to add our images. Here's our cover photo in the background and then our profile picture. And you'll notice as we're entering this information, things are filling in on the page. For example, it says that I'm a business consultant, shows my email, and of course I don't have any followers yet. Let's go ahead and add the profile picture.
(06:52):
Now you'll notice my head is cut off a little bit here. That's okay when we go to edit, if this happens, there is a way to position it, so don't worry too much about that. And you can also, if you prefer, just crop it initially to make sure it's fitting the way you want. But I had this profile photo, I've used it, I will adjust it later. I now add my cover, right? All right, and here comes. Now this one actually allows you to drag it around and reposition it if you want, right here. So you can actually drag it around and position it. I don't recommend putting an, when we actually go to publish, the profile picture's actually gonna end up over here, so my text will be okay Because of that, I recommend keeping your text on the right side and leaving the left side for your profile picture.
(08:00):
Also, you don't need a second picture over here because your profile picture will take care of that. If you have a logo for a business page, you may want to use the logo here instead of your picture. And if you want to have your phone number, this is by the way, just a, a stock photo. This is not accurate, but um, it's from a template, but you can have your phone number or email up here if you want to place that. Now that finishes what we have to do here. We also have the option to add a action button. So that action button will come up over here where it right now says follow. And there's a message option where they can send you a Facebook chat, but I can add an action button. Let's look at that and we, it's gonna give us the option to customize it. There
(08:54):
Are multiple options for Action Buttons. You can open up a website to a signup form. You can view a shop, get tickets, chat, send emails, go to your web, send people to the website, send 'em to a contact form. There's so many options and each option will have a little bit different piece of information. It's gonna ask from you to configure it. Of course, we're gonna just say send email. We're gonna click on next. It needs the email that we're gonna send to, we're gonna save it. And then when we get to our page, we will have that option. Let's go ahead and move to the next step three of five. Step 3 of 5 allows you to connect WhatsApp to your page. So if you're using WhatsApp, enter your phone number, get a code and get connected. I'm not going to do that here, so we're going to skip it.
(10:00):
You also have the option to invite your friends. Now I told you I don't use this from my just friend's perspective, I'm not going to do that. There are some insights into the page that you need specific numbers of, of people to follow, like the page in order to see. So you may want to invite friends. However, I'm gonna be really caution you a lot of times when we are launching a new business or working a new business to improve our lives. Some people are very supportive and some people are negative. They, they like to give us a lot of negative feedback. They're the uh, Debbie Downers surrounding you. If you're going to invite your friends, I really recommend only inviting people you know are gonna be the ones who have your back and support you in this because you want your focus to be on starting your business and getting things going, not having to deal with negativity.
(11:06):
Let's go ahead to the next step. And the final step here on this piece is what notifications do you want? I recommend just leaving the default and getting both the notifications about your profile as well as marketing information from Facebook as you get used to using your page. If you're getting a lot of marketing emails and you will because they want to sell you advertising, then you may want to turn that off. But I do like to keep the information about what's going on on my content page as people engage with me. We're now gonna click one Done
(11:57):
And hey, our page is created. We have now been switched into the Kim Shivler Content Services Profile. Remember I said I will actually have a profile with this and it starts us out by launching a tour. It's a quick, quick tour. It just shows us where this is where we can switch between those profiles. And next you can get things done by managing your page, get insights, create ads, et cetera. You can explore the feed with the home button over here and then last, if you ever wanna start the tour again, just click on these three dots. This is also, if you'll notice this area, this is where you can edit that action button if you wanna make changes to it. You can set your page in tagging settings, you know who can post on your page, what the, what can they see on your page, et cetera.
(13:00):
And then there are other options to explore here. Now as we start our page, of course they want us to write a welcome post. I, I hope you will do that. Uh, this is that intro. Notice where the bio was your business consultant, what you do, your email address if you want to edit the details here, you click on edit details and then notice you can come back and add your address, et cetera. Be very careful. This ad services is not what we're going to want for our services. We're gonna go there in just a minute. The things we want to add at this point, now that we have gotten those basics in that the information didn't actually give us, is we want to add more about our about page. So right now we click on our about, uh, we have, as I said, where we can put our address and phone, et cetera, website, social links.
(14:09):
We want to go ahead and do that. Absolutely add your privacy policy. If you have work or education that ties in to the business that you're running, absolutely put that there. I leave out where I have lived for this. It's a business page. Page transparency is Facebook not, uh, this is letting people know if you're running ads, et cetera. We don't change that. Uh, I don't put relationship statuses on my business page. Uh, but then here in the details, I recommend putting some details about yourself. This is kind of that about you section that you would have on a website or somewhere else. So I have, I have created some cheat sheets here so you don't watch me type. I put those here and save it. So now I have a little more about information. If you have a name that's hard to pronounce, it's a good idea to enter, how to pronounce it here, nicknames, et cetera. This is up to you. The next thing we wanna do, which has gotten strange recently, they changed the Facebook interface, they've changed to the new page experience and when they did that, they kind of hid the services. So notice here along the top, there's no services. In order for me to go and add services, what I actually have to click on is over here on the left under managed page, I click on the Meta Business Suite.
(16:01):
Now this is the suite that allows you to see the information, the insights about your page allows you to do ads and plan things, post things. But this one throws people a lot because it's kind of hidden back here. We then click on All Tools and this gives us all the different tools. So we have ads, like I said, we can manage events, we can link business, business apps, insights. And the key down here is to sell products and services. If you're allowing people to book appointments, there's options. If you want to list products, there's options and we're gonna click on Services to list our services. On the Facebook page, we start blank. We're going to click and add a service. Now notice we have the option to put a photo. Not gonna do that today. We then need the name description, pricing and duration information.
(17:07):
I'm going to show you two options here. So we're gonna start with my content posting services. That is a service I help people with where they need help getting everything posted. They're creating, I'm posting. So I put in my description. Now in this case, this is a variable price. So, so you have all these options. It can be fixed, it can be a variable, it can be starting at, you can just not put a price, it can be custom. I put variable price, which custom might work here too. And that's because it's a variable duration. So depending on what they need, the price and the duration are going to vary. I then click on add service and you can now see that I have a service here. Now I wanna add one more to show you just one other option.
(18:13):
Sometimes as a Virtual Assistant, I'm gonna click on add service. You might want to create a service that's really more of a product and it has a flat rate, but it's more like a product. So for, in this case, one of the things I do is I will create newsletter templates. So for example, I create a MailChimp template for someone and it's got their logo text where they can put their blog post info, a place where they can input the link, some about information, contact information, and then they never go in to create their email and forget anything. They just kind of have to go in and put in, uh, replace the text for the basic information, replace the link, et cetera. And on this one I do it as a fixed price and it's $250 and that is going to be a duration varies and they don't even need to know further about that.
(19:27):
But the key is that this is fixed price. So someone can hire me to do this and that is $250. Now, I might want to change the order of this and I do content posting is a higher product that I do or a higher level service, a more popular service I should say. So I'm gonna click on edit order, which you notice turns these into where you can just drag them, save the order, and I now have created my services. Now one thing to notice, the Meta Business Suite, when we click on that opens a new tab, it actually takes us into a new area of Facebook, see the url, business.facebook.com. We're actually under their business area. So I'm gonna click here on the tab back to my content services and I need to refresh that page and you will now notice that there is a tab for services and you can see the services that I have added.
(20:44):
Before we finish, there is one last step finishing the page. Then I'm gonna give you a few tips about editing. But one more thing needs to happen before we truly finish this page. And that is to add the URL, the username, which is also the URL where someone can go to facebook.com/and actually type in or paste in a link and get to your page. We do that by again, over here on the left manage page, we're gonna click on settings. And here at the top of the general page settings, notice my name of the page is Kim Shivler Content Services, but there's no username. What you wanna do here is put in, type in what you want and it will let you know is that available. As long as that's available, then you can save the changes. I'm not gonna do it here. And the reason is, once you click on save changes, you have to enter your Facebook password.
(22:00):
That is the password of your main profile. Remember we have our main profile and from that we build everything. Our business pages manage other people's pages, et cetera. So when you click on Save changes, you will need to enter your Facebook profile password, at which point it will create the page and then it would look just like this, facebook.com Kim Shivler Content Services. And you can share that page with that, that link with people. The same way you could a website or any other link about who you are. That my friends, is the overview of building your Facebook business page. A few highlights on editing, I'm gonna leave here cuz I'm not saving it. Few highlights on editing. Uh, as we mentioned here under the three dots, you can edit your action button as well as your tag settings. When you click on manage, you can manage information about your page and go back through, you know, establish an identity, et cetera, cuz it's showing you how many of your steps you have created back to the page under Edit.
(23:34):
This allows you to edit that profile. Picture the photo, you can add an avatar, you can edit your bio, you can add hobbies and featured. I do recommend that if you're going to do this, that they are relevant to your business, not just something fun. For here on the profile picture, if I click edit and edit thumbnail, notice, this is where I can drag it to reposition it. So there I go. I've dragged that. Save it and I now have my Facebook page. Thank you for joining me. As always, I'm Kim Shivler. Please let me know in either the comments on the YouTube video or on the post if you have other questions, feedback, et cetera. I appreciate your time. I look forward to seeing you next time. Bye.